Congrats, you found this! It’s a work in progress, so please pardon the dust.
Ultimate Whoop Beginner’s Guide
Welcome to the Ultimate Whoop Beginner’s Guide, your all-in-one resource for diving into the exciting world of tiny whoops. Whether you’re completely new to drones or you’re looking to explore the world of whoops, you’re in the right place.
Tiny whoops are lightweight first person view (FPV) drones that pack a surprising amount of power, speed, and agility into a tiny package. Whether you’re flying in tight indoor spaces, hitting technical freestyle lines, racing your buddies, or just casually flying around your home, tiny whoops can do it all. But getting into FPV isn’t always easy. With so many gear options, unfamiliar jargon, and no obvious place to begin, figuring out how to start can quickly become overwhelming.
That’s where this guide comes in.
I’ll walk you through everything you need to choose the right whoop, understanding your gear, getting in the air, and learning to fly with control and confidence. Every section is designed to be simple, clear, and actionable, whether you’re setting up your first quad or learning how to pull off a trippy spin.
What You’ll Get Inside This Guide:
- A complete breakdown of the gear and parts that make your whoop fly
- Step-by-step setup instructions so you can get flying fast
- Pro tips to avoid beginner mistakes and bad habits
- Gear recommendations that are current and worth your money
- Progression tips to help you grow from hover to high-speed freestyle
Whether your goal is racing, freestyle, cinematic flights, or just a fun new hobby, this guide will help you build skills, avoid frustration, and get the most out of every pack.
Ready to fly? Let’s get started!
What’s a Whoop, and Why It’s the Perfect Place to Start
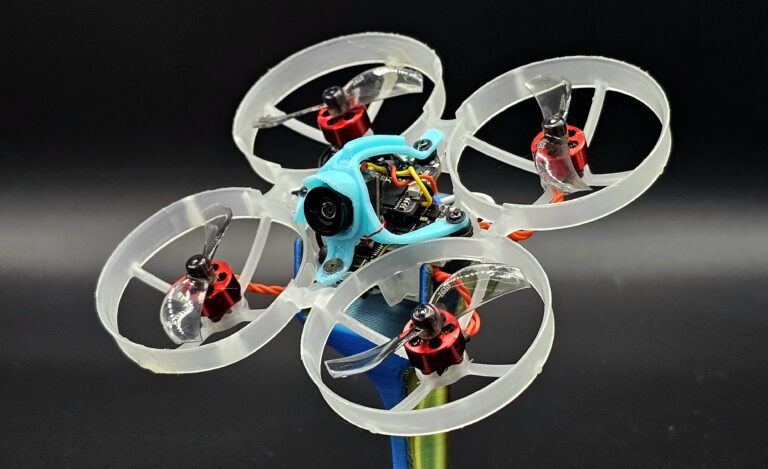
A Tiny Whoop is a micro FPV drone, typically 65mm to 85mm in size, with ducted propellers and a built-in camera that lets you see from the drone’s perspective while flying. The concept came from Jesse Perkins, who modified a Blade Inductrix by adding an FPV camera and created a new kind of flying experience. He called it the Tiny Whoop, but it’s often referred to as a whoop now. Since then, the term has grown beyond the original brand and now refers to any micro drone with ducts.
What makes whoops so appealing is how much you can do with them. They’re safe, agile, and built to fly in places that full-size drones could only dream of. Whether you’re ripping around the living room, cruising around a park, or diving down the side of a tall building, a whoop opens up flying spots you never thought possible. And that’s just the beginning.
When it comes to versatility, whoops are in a class of their own. You can fly them literally anywhere: your living room, backyard, parking garages, abandoned buildings, playgrounds or any place that isn’t an FAA no-fly zone. They’re compact, lightweight, safe enough to fly around people, and powerful enough to pull off highly advanced freestyle tricks. On top of all that, whoops are beginner-friendly, easy on the wallet, and insanely fun to fly.
Why Start with a Whoop?
- Fly Virtually Anywhere
You don’t need a big field or perfect weather to fly a whoop. Their small size and built-in prop guards make them safe to fly indoors, around people and pets, and in tight spaces. As long as you’re not in an FAA no-fly zone, the world is your playground - Portability and Ease of Use
Whoops are ultra portable. They’re small enough to toss in your bag and light enough to take anywhere. Setup is quick and simple, so you can be in the air within minutes whenever you’re ready to fly. - Freestyles Like a Full-Size Quad
Whoops can handle every trick you’d throw at a full-size quad, from powerloops to trippy spins to baranis. The difference is, they do it in tighter spots, with less risk, and way more freedom. They’re insanely agile, fast, and powerful for their size, capable of flowing legit freestyle lines through spaces a 5-inch wouldn’t even dare to fly. For a lot of pilots, once they unlock what a whoop can really do, their 5-inch starts collecting dust. - Cost-Effective Learning Platform
Whoops cost less to buy, fix, and maintain compared to larger drones. Even the batteries are cheaper, so you can spend more time flying without draining your wallet. - Beginner-Friendly and Durable
Whoops are fun, easy to fly, and tough enough to handle crashes, which makes them perfect for learning. Crashing is very common when learning to fly, but their durability means fewer repairs and more time in the air. - Strong Community and Support
There’s a whole FPV community built around whoops, with forums, Discord groups, races, tutorials, and events. Whether you need advice, feedback, or just want to connect with other pilots, the support is already out there waiting for you.
Common Use Cases for Tiny Whoops
- Freestyle: Focused on creativity and flow, freestyle is about linking tricks together and flying smooth lines through tight spaces. This is where you build style, control, and precision.
- Racing: Dive into fast-paced, close-quarters racing on tight, challenging tracks built for precision and speed.
- Cruising: A relaxed style of flying with no pressure. You’re just exploring your surroundings, floating through the air, and enjoying the experience.
- Cinematic Flights: Flying slowly and deliberately to capture clean, stable, and high quality footage. Great for fly-throughs, reveals, or exploring interesting locations with style.
- Skill Development: Whoops are great for building core skills like throttle control, timing, speed, and coordination. Their small size and durability make it easy to practice consistently without worrying about crashes, expensive repairs, or needing a large space to fly.
Whoop Anatomy – Know Your Parts
Before we dive into choosing your first whoop, it’s important to understand what makes these little whoops fly. Every component, from the frame and motors to the camera and battery, plays a key role in how your whoop performs. In this section, we’ll break down each part of a Tiny Whoop so you’ll know exactly what you’re looking at when comparing drones or troubleshooting issues later on. Having a solid understanding of your gear will help you make smarter buying decisions, troubleshoot and repair with confidence, and build a stronger foundation as a pilot.
Frames
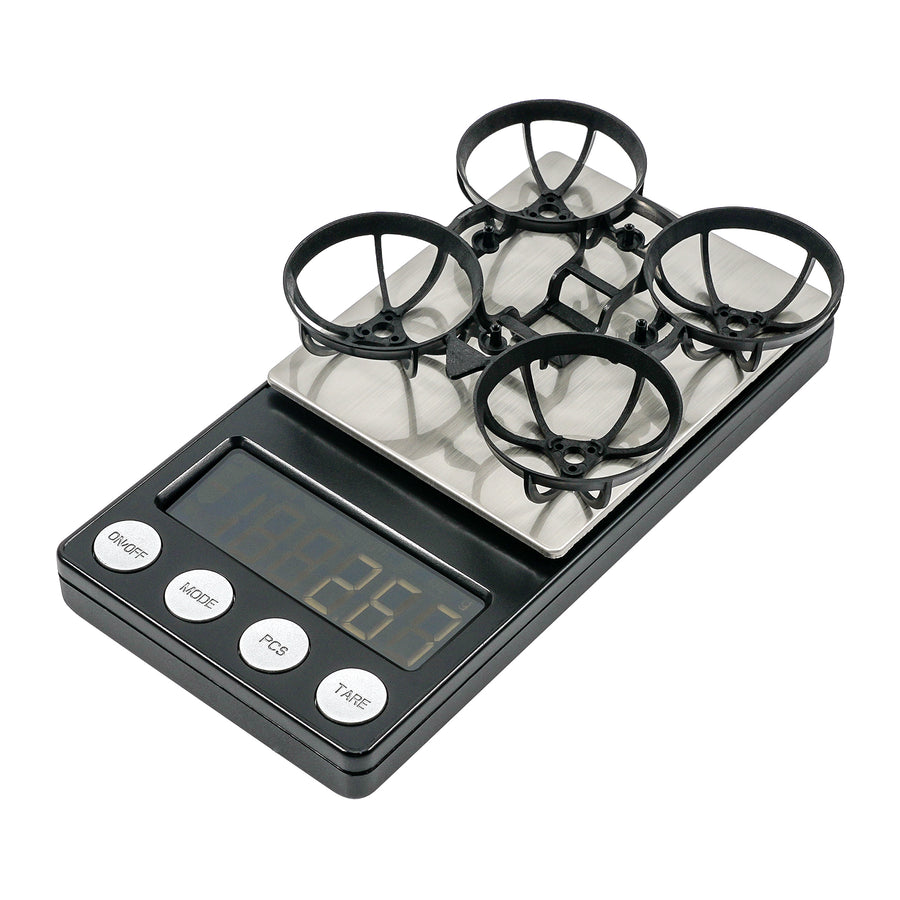
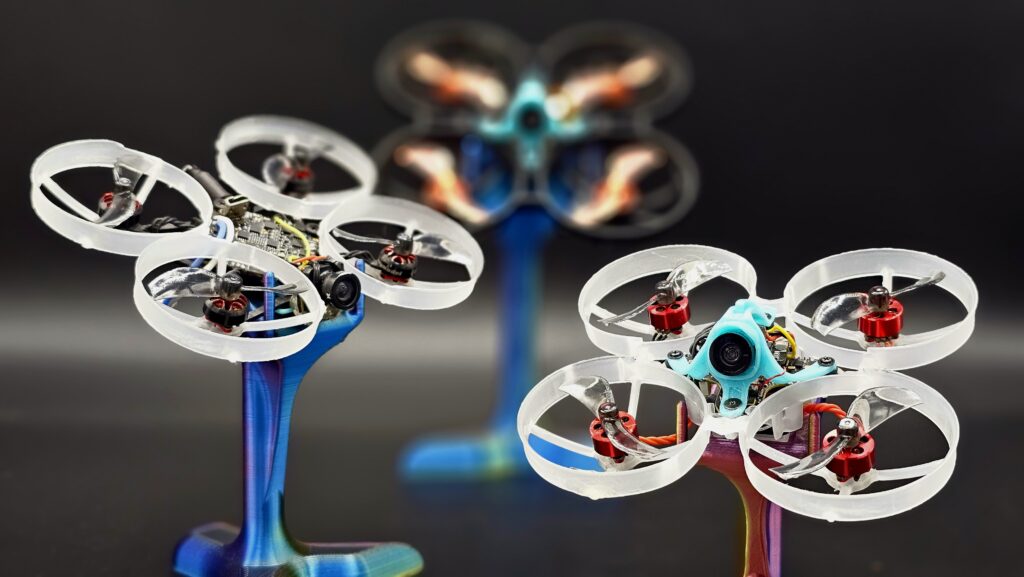
The frame is the backbone of a Tiny Whoop. It holds all the components together and defines the shape and structure of the drone. Most whoop frames are made from lightweight, flexible plastic like polypropylene, which keeps the weight low while helping absorb impacts from crashes. The built-in ducts around the propellers add protection and help the drone glance off walls and obstacles. This not only prevents crashes but also lowers the risk of damaging people or property.
Whoop frames may look simple, but they have a big impact on how your drone flies. The most common sizes are 65mm and 75mm, measured diagonally from motor to motor. A 65mm frame is lightweight and built for tight indoor spaces, usually running 31mm props and weighing between 2.4 to 2.9 grams. A 75mm frame supports 40mm props and bigger motors, adding power and stability for outdoor flying or more open areas, with frame weight typically around 4.0 to 4.5 grams. Choosing the right frame comes down to where you plan to fly, how much abuse your setup needs to handle, and what kind of performance you’re aiming for.
Flight Controller
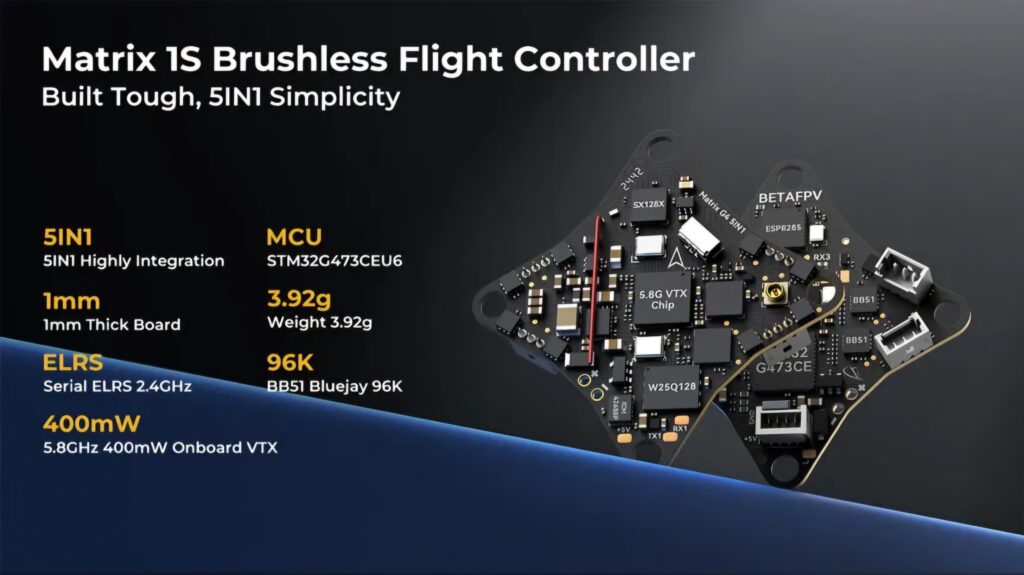
A Flight Controller (FC) is the brain of your whoop. It’s a compact, all-in-one board that manages nearly every function of the drone. By combining multiple systems into a single unit, it keeps your build lightweight, efficient, and easier to set up. The FC controls how your drone flies, connects to your radio, powers the motors, sends out the video feed, and overlays flight data on your google screen, all from one tiny board. Here’s a breakdown of each core component and what it does:
- Flight Controller (FC): The flight controller is the brain of the whoop. It uses a microprocessor and sensors like a gyroscope and accelerometer to understand how the drone is moving. When you move the sticks on your transmitter, the FC takes those inputs and adjusts the motor speeds to keep the drone stable and flying the way you want.
- Electronic Speed Controllers (ESCs): These are the circuits that tell each motor how fast to spin and in which direction. A whoop has four motors, so the flight controller includes four ESCs, one for each. They respond to the flight controller’s commands and adjust motor speed in real time to keep the drone stable. Most modern ESCs also support features like DShot for smooth control and turtle mode, which lets you flip the drone upright if it crashes upside down.
- On-Screen Display (OSD): A feature that shows important flight info, such as battery voltage, flight time, and signal strength, directly on your FPV video feed. It gives you real-time data while flying so you can make quick, informed decisions with a glance.
- Video Transmitter (VTX): This component sends live video from your drone’s camera to your FPV goggles. Many built-in VTXs allow you to adjust power levels, typically ranging from 25mW to 400mW, so you can balance signal strength and reduce interference when flying with others.
- Receiver (RX): The receiver connects your controller to the drone by picking up your inputs and passing them to the flight controller. It makes sure your commands, such as throttle, pitch, roll, and yaw, are instantly translated into action during flight. Systems like ExpressLRS are commonly used for their speed, range, and reliability.
Motors
Motors are what spin the propellers and lift your whoop into the air. They’re small, brushless, and surprisingly powerful for their size. But what really makes one motor feel different from another comes down to two key parts: the stator and the bell.

The stator is the fixed core of the motor, made of metal and wrapped in copper wire. When electricity flows through the wire, it creates a magnetic field that interacts with the bell to generate motion.
The bell is the part of the motor that spins. It holds the magnets and is directly connected to the propeller. When the stator generates a changing magnetic field, it pulls on the magnets inside the bell. This magnetic pull causes the bell to rotate, which spins the propeller and creates thrust.
Motor sizes use numbers like 0702 or 0802 to describe the size of the stator inside. The first two digits are the width, and the last two are the height, both in millimeters. So a 0702 motor has a stator that’s 7mm wide and 2mm tall. In general, bigger stators produce more power and torque, which can give you stronger performance, but they also add weight, which can reduce flight time and make the drone feel less responsive.
Here’s a simple guide for motor sizing and which whoop frame they work best with:
- 0702 – Lightweight and snappy, perfect for 65mm whoops
- 0802 – More torque and punch, ideal for 75mm whoops
- 1102 – Bigger, stronger, and weighs the most, best for 75 Pro whoops
- 1002 – Not recommended: too heavy for 75mm whoops and underpowered for 75 Pro whoops
Along with size, motors are rated by kilovolts (kV), which tells you how many revolutions per minute (RPM) the motor will spin for every volt of electricity you supply. For example, a 20,000 kV motor will spin 20,000 times per minute for every volt you give it. Higher kV motors spin faster and feel more aggressive, but they use more battery and can be harder to control. Lower kV motors spin slower, giving you smoother throttle control and longer flight times, which is better for beginners or longer freestyle runs.
Here’s a quick breakdown of kV ranges:
- 19,000–24,000 kV: Slower motors with smooth throttle response. Great for beginners and longer flights.
- 25,000–29,000 kV: A balanced choice for intermediate pilots who want more power without losing too much control.
- 30,000–36,000 kV: Ultra-fast motors that deliver explosive power and sharp responsiveness. However, they burn through batteries faster and can feel twitchy, so they’re best suited for experienced pilots who prioritize raw power over flight time and smooth control.
Understanding Stator Volume, Shape, and Performance
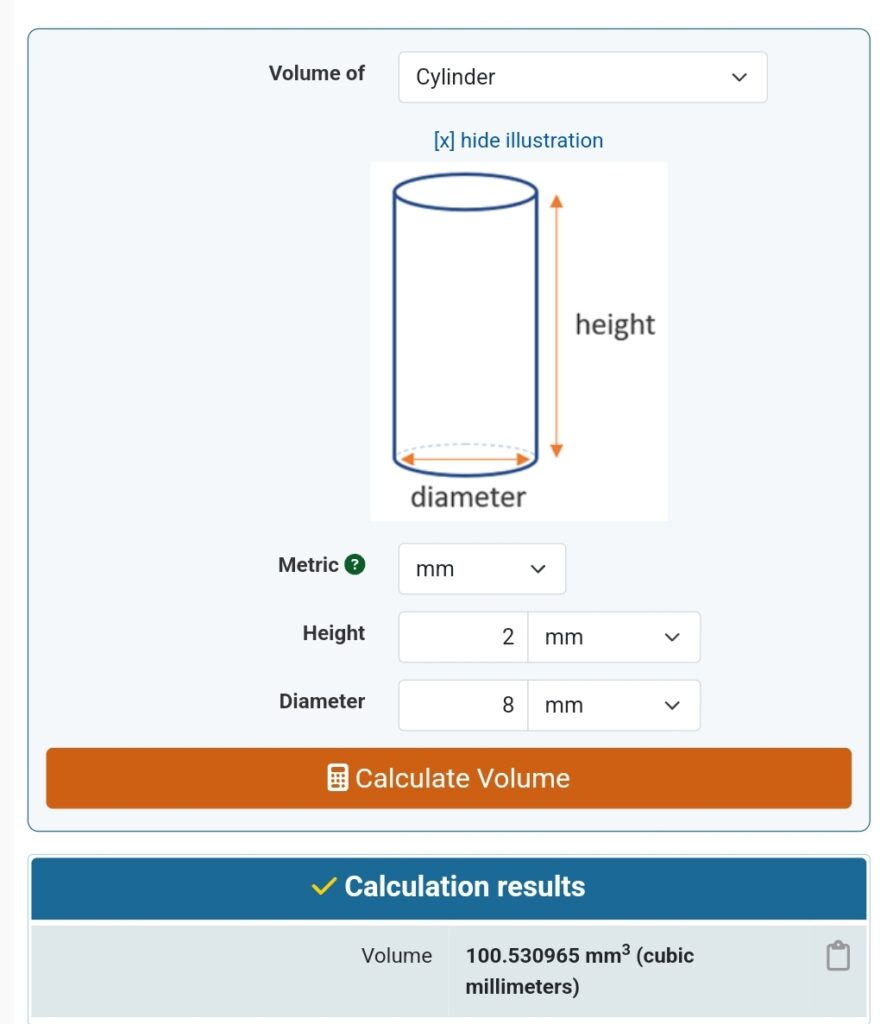
The size of the stator affects more than just weight. It plays a key role in how much torque and power your motor can deliver. A wider stator allows for more copper windings and can handle higher current, while a taller stator gives more leverage to generate magnetic force. Together, these dimensions determine the stator’s total volume, which gives you a rough idea of the motor’s power potential. If you want to compare different sizes, you can plug the stator’s height and diameter into a Cylinder Volume Calculator to see how they stack up.
Examples of Stator Volume:
- 0702 ≈ 77 mm³
- 0802 ≈ 100 mm³
- 0803 ≈ 150 mm³
- 1102 ≈ 190 mm³
Keep in mind that the shape of the motor matters just as much as its stator volume. Even when two motors have the same volume, a wider stator behaves differently than a taller one.
Wider stators (like 1102) generate more torque, which gives your whoop stronger acceleration and better performance with heavier setups. But they also tend to weigh more, and because their mass sits farther from the center of rotation, they have higher rotational inertia. That means they resist quick changes in speed or direction, making your drone feel slower to react during fast transitions. It’s like spinning a large steering wheel versus a small one. The bigger wheel takes more effort and time to start or stop because its mass is farther from the center. Wider stators behave the same way.
Taller stators (like 0803) respond faster because more of the mass is closer to the center. They spin up and down quickly, making the drone feel snappier and more responsive. However, they generally produce less torque and can run hotter under load.
So while more volume usually means more power, the shape of that volume determines whether that power feels strong and deliberate or fast and twitchy. Choosing the right stator size and kV comes down to balancing power, control, and your personal flight style.
To Sum it all up:
- Lower KV: Slower speeds with longer flight times. Great for beginners, relaxed cruising, or cinematic flying
- Higher KV: Faster speeds with shorter flight times. Better for experienced pilots who like to racing or perform fast freestyle tricks.
- Wider stators: Delivers more torque and power, but are slower to accelerate and change direction due to higher rotational inertia. Best for heavier builds that need extra thrust.
- Taller stators: Provides quicker responsiveness, but offers less torque. Ideal for lightweight whoops and pilots who fly fast.
Motor Setup and Direction
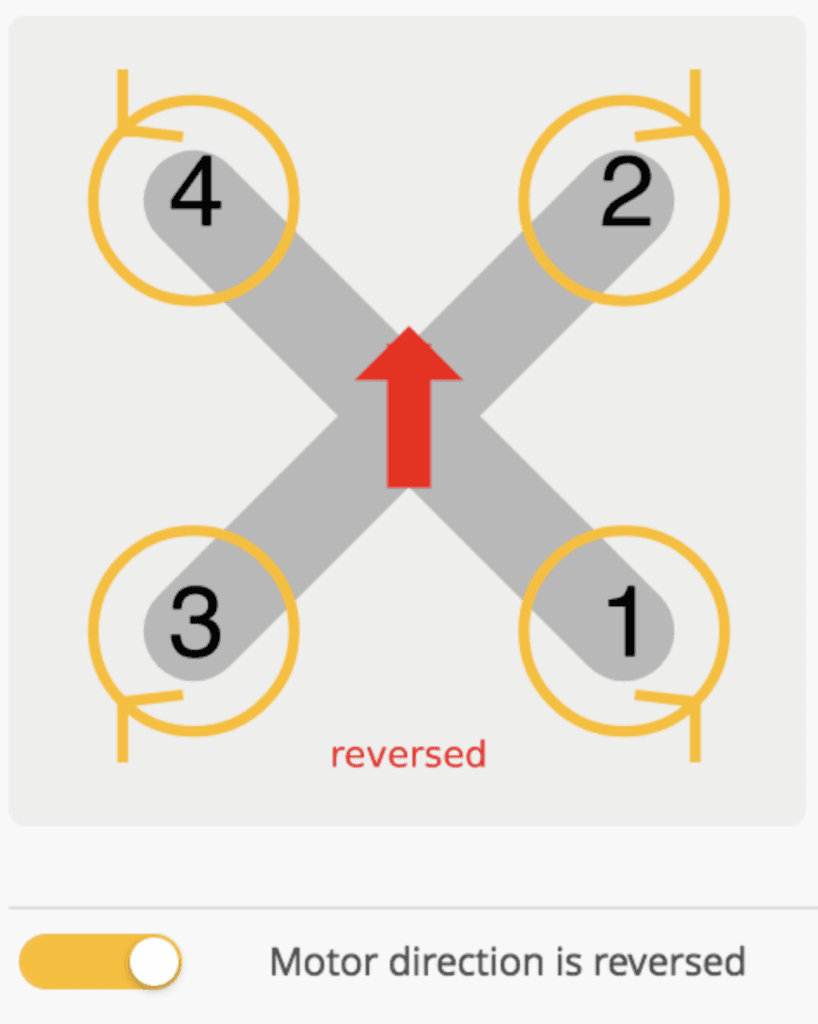
Once you’ve chosen the right motor size and kV for your build, the next step is mounting them to your whoop. Motors are arranged in an X pattern and follow a specific spin direction to keep your drone stable in the air. Most whoops use the “reversed” motor layout, where the front-left and rear-right motors spin counterclockwise, and the front-right and rear-left spin clockwise. This outward spinning setup helps with debris deflection and helps prevent prop wash when performing dives.
Motors are also labeled 1 through 4, starting with motor 1 at the back-left. You’ll often hear pilots refer to a specific motor number when troubleshooting issues, so it’s good to get familiar with the layout. Some motors plug into the flight controller for quick replacements, while others are soldered directly for less weight and a cleaner build. If a motor spins the wrong way, you can change its direction in the Betaflight configurator. We’ll walk you through how to do that later in the guide.
add in motor calc sheet?
Shaft size difference
XXXXXXXXXXXXXXXXXXXXXXXXXXPropellers
Propellers, more commonly called props, are one of the simplest parts of a whoop, but they make a big difference in how it performs. They’re responsible for creating lift, steering, and overall flight feel. The size and shape of the prop, along with how many blades it has, all affect how your drone responds in the air. Whether you’re aiming for smooth control or raw power, picking the right props can help you dial in the flight style you want.
Prop Sizes by Frame
Every whoop frame is built to fit a specific prop size. The right prop size gives you the power, efficiency, and control the frame was made to deliver. If you go smaller than what the frame was designed for, your whoop will feel weak and less responsive. Here’s a quick guide to match them up:
- 65mm: 31mm props
- 65 Pro: 35mm props
- 75mm: 40mm props
- 75 Pro: 45mm props
- 80mm: 45mm props
- 85mm: 2in Props
Common Prop Issues
Before we discuss some of the aspects of props, lets talk about common issues so that you can better understand the different prop types and how these common issues impact them
Prop Wash
Washout
CW vs CCW
What it looks like. use image. also mention that it references the x pattern mentioned in the motor section.
Props in vs Props out
Blade Count:
Bi-blade props are more efficient (better flight time) and spin up faster, but they can feel less stable during fast moves and create more “prop wash.”
bi-blade props have slightly less drag and can be more efficient (longer flight time) but often at the cost of some thrust and increased prop wash in fast maneuvers.
Tri-blade props give you more grip in the air and better control, especially in tight spaces or sharp turns.
Tri-blade props give more thrust and control authority (useful for quick turns and maintaining stability),
- more blades = reduce the likelihood of prop wash/washout
- less blades =
- quad blade is less efficient than 3 blade, and may over-prop the motor, leading to prop wash, yaw washout and overall worse flight feel. Not really recommended in most cases.
Installation
Physically, whoop propellers are press-fit onto the motor shafts – no screws or locknuts needed. Most use a 1.0 mm shaft hole, but some may use 1.5mm shafts. . Installing props is as simple as pushing them onto the motor bell (and pulling off to remove). It’s important they fit snugly; some props may need the hole trimmed or drilled slightly to fit all the way down on the shaft for durability
Replacing Props
The ducts on the frame closely surround the props, which helps guard them from strikes. If a prop gets damaged (tiny nicks or bends can degrade performance), they are cheap to replace. Damaged props will impact flight performance, often causing a reduction in flight time, flight performance, or may cause vibrations in the camera. If a prop gets bent, you can often just bend it back into place and it’ll be fine. but if it keeps bending in the same place, then i would recommend replacing it. a single small knick is not a big deal and easy to get, i would replace it if theres multiple knicks or its starting to deform the propeller.
Gemfan or HQProp?
Two main prop brands dominate the whoop world—Gemfan and HQProp—and they fly very differently.
- Gemfan props (like the 1219 and 1610) have a higher pitch (around 1.9″), which means the blades are angled more aggressively. This gives you more thrust and power but also draws more current from your battery.
- HQProp ultralight props (like the 31mm and 40mm) have a lower pitch (around 1.1″), which makes them easier to control, more efficient, and better for high kV motors. These props are super lightweight and feel very responsive in the air.
Weight and Feel:
Light props spin up faster and put less strain on the motor.
- HQ 31mm ultralights are super light (~0.125g each) and great for speed and responsiveness.
- Gemfan 1219s are a little heavier (~0.28g each), but stronger and better for lower-kV motors that need more bite.
Lighter props with thin blades put less load on the motor and spin up quickly, which improves responsiveness. For instance, the HQ 31 mm ultralight tri-blade prop weighs only ~0.125 g each (about 0.5 g for four) and is a favorite for ultra-light builds with 0702 motors ~30,000 kV. These lighter props give excellent agility and don’t strain the small motors.
In general, higher-kV motors pair well with lighter or bi-blade props, since the motors can spin them extremely fast to compensate for any loss of thrust
A slightly heavier but more robust option is the Gemfan 1219 tri-blade, which provides a bit more thrust and durability, and is ideal for moderate kV motors (below ~22,000 kV)
Mounting Props:
Whoop props are press-fit onto the motor shafts—just push them on, no tools required. Most motors use a 1.0mm shaft, but check your motor to be sure. Props should fit snugly—if they’re too tight, you may need a prop remover tool to pull remove them.
Video Transmitter (VTX)
The Video Transmitter (VTX) sends the live feed from your drone’s camera directly to your goggles, giving you a real-time view of what the whoop sees. Whoops come with either analog or digital VTX systems. While the technology behind each is different, both are designed to be compact and lightweight enough to fit inside these tiny frames. Knowing how your VTX works helps you get cleaner video, avoid interference, and stay connected while flying.
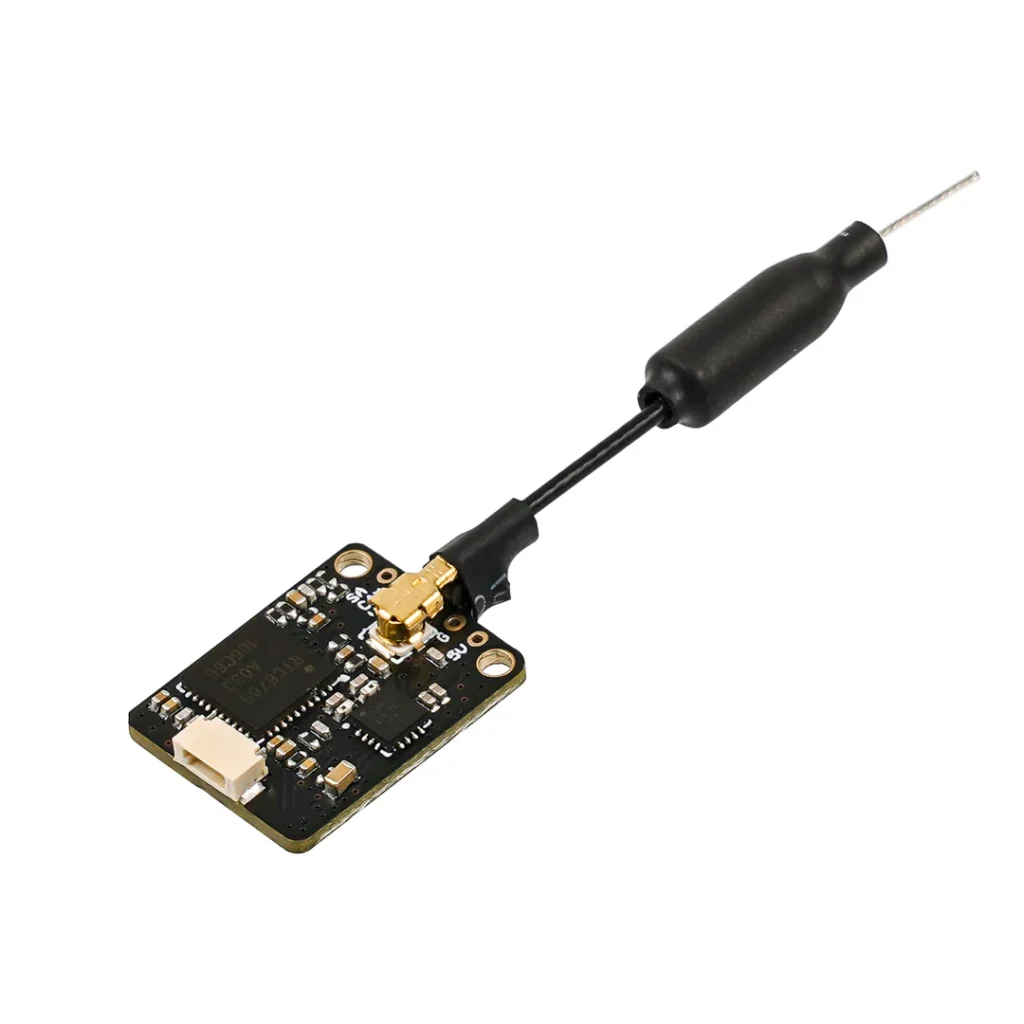
Analog VTX – Lightweight, Simple, and Proven
Analog is still the most popular option for whoops because it’s lightweight, affordable, and has very low latency, making it great for fast reaction times during freestyle or racing. It works by taking the signal from the camera and broadcasting it over the 5.8 GHz frequency to your FPV goggles. Most analog VTXs are built right into the flight controller as part of an all-in-one board, which keeps things compact and easy to manage. Some flight controllers leave out the VTX entirely and require you to buy and solder on an external module.
That said, image quality is where analog falls short. Compared to digital video, analog looks more like old-school 1990s TV: grainy, low resolution, and prone to static when the signal gets weak. It’s perfectly flyable and still the standard for many whoop pilots, but it’s important to know what to expect.
- Power Output (mW): Most analog VTXs on whoops default to 25 mW, which is plenty for indoor flying or staying close in small outdoor areas. Some boards let you increase output to 50, 200, or even 400 mW for more range and signal strength. Just keep in mind that higher power can lead to overheating and more interference with other pilots. For tight indoor spaces or small backyards, 25 mW is usually the safest bet. If you’re flying farther out, flying around or behind large objects, or in areas with heavy Wi-Fi interference, bumping it up to 400 mW can help maintain a clear signal.
- SmartAudio: Many analog VTXs support SmartAudio, a protocol that lets you change video settings such as channel, band, and power output directly through your FPV goggles using the Betaflight On-Screen Display (OSD) or through your radio menu. This means you can adjust your drone’s video settings without plugging it into a computer or pressing tiny buttons. It simplifies setup and helps you quickly adapt when flying with others.
- Antennas: Most come with a basic linear wire antenna, but upgrading to something like Ort antenna can improve signal clarity without adding much weight.
Analog Pros:
- Analog Pros:
- Lower overall weight, which helps improve flight performance and battery life.
- Low power draw, making it efficient for small 1S whoops.
- Very low latency, giving you a near-instant video feed that’s great for fast freestyle or racing.
- Universally compatible with all analog FPV goggles and some digital goggles that support an analog module.
- External VTX units are affordable, widely available, and often more crash-resistant than delicate digital setups.
Analog Cons:
- Lower video quality that looks grainy and low-resolution
- More prone to interference, particularly when flying near other pilots.
- Weaker signal penetration, making it harder to fly behind walls, trees, or other obstacles without losing image clarity.
Digital VTX: HD Video in a Whoop-Sized Package
Digital video systems give you a crisp, high-definition view from your drone, offering a massive improvement in clarity compared to analog. You’ll see more detail, better colors, and far less static, which makes flying feel more immersive and precise. But that boost in image quality comes with tradeoffs. Digital gear is heavier, more expensive, and often requires more setup and care to get everything working smoothly. Still, for many pilots, the visual upgrade is worth every gram and dollar. Lets talk about the main digital systems
HDZero
HDZero is a digital FPV video system built specifically for pilots who want high-definition video without sacrificing low latency. It delivers a 720p HD feed with fixed full-frame latency around 14 to 20 milliseconds, giving pilots a responsive, real-time experience that feels close to analog. This consistency sets HDZero apart from other digital systems like DJI and Walksnail, which use variable latency to prioritize image quality.
HDZero is often advertised as a high-definition system, but its video quality is generally considered closer to enhanced analog. It produces a cleaner, more stable image than analog but lacks the sharpness and dynamic range of systems like DJI or Walksnail. The image is functional and reliable, but not cinematic. That said, HDZero performs consistently in a wide range of environments, including low light, where it really shines. LED lights appear especially bright and colorful, making it a strong choice for night flying or indoor tracks lit with LED gates.
Where HDZero stands out is in high-speed racing and freestyle. The signal remains smooth and predictable, even in noisy or interference-heavy environments. When the video feed begins to break up, it does not freeze or drop out entirely. Instead, it shows a distinct rainbow-like static effect, commonly called “sparkles,” which can be more difficult to fly through than traditional analog static.
Newer models of HDZero goggles offer built-in support for both HDZero and analog video, while older models include the ability to add an external analog module. This allows pilots to fly either analog or HDZero using a single headset, making it one of the only digital systems with native analog compatibility.
HDZero’s goggle system is also one of the most expensive on the market, even surpassing the price of digital systems that offer true high-definition video. While its performance appeals to many, the premium price can be hard to justify for pilots expecting top-tier image quality or those just getting started in FPV.
For pilots who value control and reaction time over cinematic footage, HDZero remains the popular choice. Its fixed latency, wide support for whoop-sized hardware, and strong low-light performance make it an excellent system for those who are willing to pay a high price for fast and responsive flying.
Walksnail
- Walksnail Avatar 1S: Offers onboard DVR and a 720p feed. Heavier than HDZero (about 6–7g with camera) and pulls more power, which can reduce flight time and require careful throttle management.
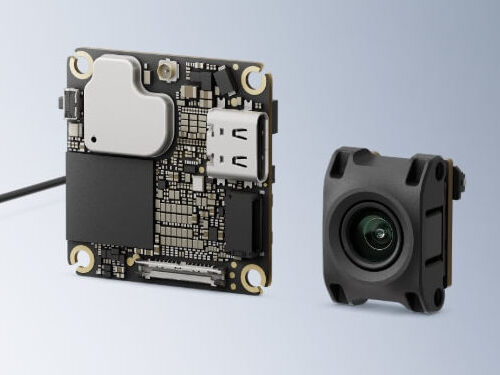
DJI
The DJI FPV ecosystem is known for delivering some of the clearest, most incredible video quality in the FPV world, and its latest iteration, the O4 Lite system paired with Goggles 3, continues to push the standard. Capable of transmitting crystal-clear 4K/60fps video with onboard DVR and ultra-low latency (as low as 20ms), Goggles 3 offer a high-end flying experience with up to 15km range in open environments. They also feature real-time head tracking, comfortable fit, and a robust design that appeals to both freestyle and cinematic pilots.
For whoop pilots, the O4 Lite system shrinks this power down to a lighter and more compact form, making it possible to enjoy HD video on micro quads. Although still heavier and more power-hungry than other whoop-focused digital systems, the O4 Lite brings top-tier video quality to builds like the 75 Pro. The 4K video feed is sharp and vibrant, and the built-in 23GB DVR means pilots can save HD footage without the need for an external camera.
However, the system is not without tradeoffs. Many users report noticeable jello or vibration artifacts in the video, likely caused by the gyro-based stabilization in the O4 camera. While some have reduced it with sturdier canopies or vibration damping, others find it hard to eliminate. The narrow field of view can also make it feel more constrained compared to systems like HDZero or Walksnail. Finally, DJI repairs can be expensive—in one case, fixing a $109 VTX cost $99, making replacement nearly inevitable.
Despite these drawbacks, the DJI O4 Lite system remains one of the best-looking digital video options available. For pilots who prioritize premium image quality and onboard recording in their whoop builds, it delivers a professional-grade experience in a surprisingly compact package.
Quick Comparison
| Feature | Analog | Digital |
|---|---|---|
| Video Quality | Grainy but flyable | Crisp HD (720p–1080p) |
| Latency | Very low | Slightly higher (HDZero is close) |
| Weight | Ultra-light (~1–2g) | Heavier (4–7g with cam) |
| Power Draw | Low | Higher (can impact flight time) |
| Cost | Budget-friendly | More expensive |
| Compatibility | Universal with FPV goggles | Requires matching digital goggles |
Beginner Tips
- Stick with 25 mW analog for indoor flights. It’s stable, legal in most places, and avoids overheating.
- If you’re flying through walls or outside, bump to 100 mW if your VTX if you’re looking for extra range or penetration.
- Never power on your whoop without an antenna connected—it can permanently damage your VTX.
- Learn how to change your channel and power level through Betaflight or your transmitter—super useful at events.
- Analog and digital goggles are not cross-compatible. Choose one and make sure all your gear matches.
The VTX is your lifeline to the drone. Analog is still the best choice for beginners and freestyle-focused pilots due to its simplicity, responsiveness, and cost. But digital—especially HDZero—is rapidly becoming more viable for whoops, offering stunning clarity in a smaller package every year. No matter which path you choose, keeping your VTX cool, properly mounted, and matched with a good antenna will give you the best experience in the air.
Radio Receiver (RX)
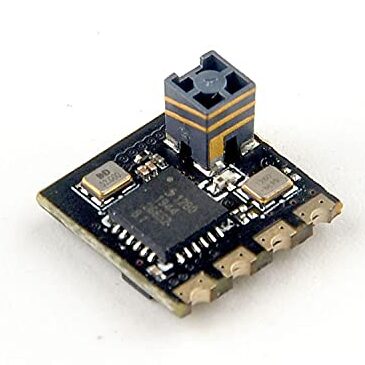
The receiver (RX) is a component that listens to your radio transmitter (controller) and relays your stick movements to the flight controller. It’s what allows you control the drone in real time. Older systems like FrSky and FlySky were popular for years, but ExpressLRS (ELRS) has quickly become the gold standard across FPV. ELRS offers impressive range, lightning-fast response times, and constant updates thanks to its open-source community. For most whoop pilots today, ELRS is the top choice.
ExpressLRS receivers are compact, lightweight, and often integrated directly into your flight controller, which keeps your build clean and simple. They offer incredibly fast packet rates, up to 1000Hz, for ultra-responsive control that feels locked in. ELRS also features dynamic power output, boosting signal strength when needed, and supports telemetry, sending flight data back to your radio. It operates on both 2.4GHz and 900MHz bands, though most whoop pilots stick with 2.4GHz for its balance of range, weight, and speed. Since ELRS is open source, it is constantly evolving and backed by a massive community of developers and pilots.
If you’re starting today, make sure your gear is compatible with ELRS! It’s fast, reliable, future-proof, and already integrated into many of the best beginner whoop kits.
FPV Camera
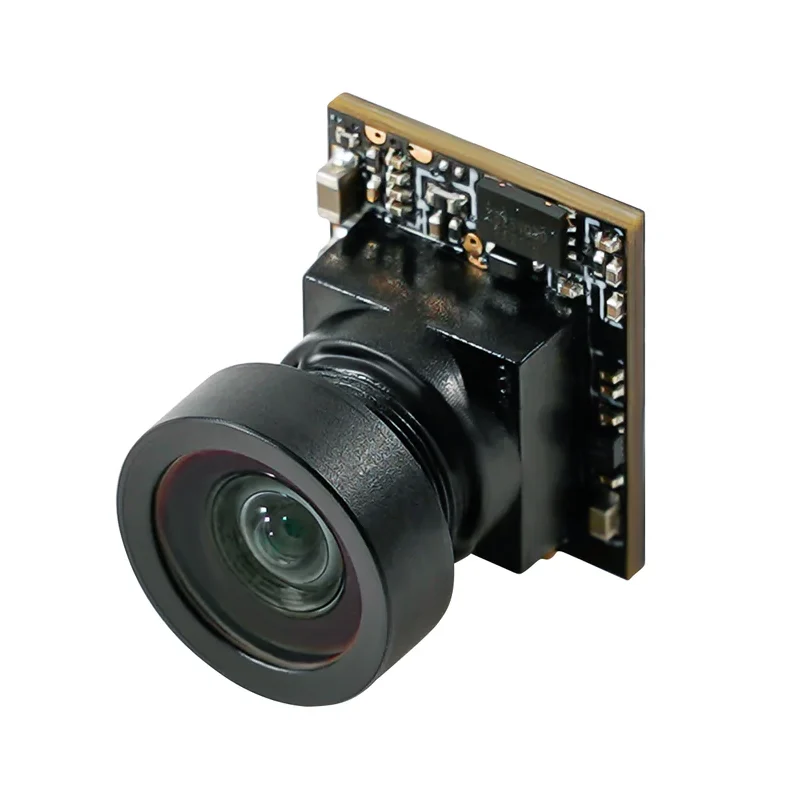
The FPV camera is what lets you see from the drone’s point of view. It captures a live video feed and sends it to your goggles through the video transmitter (VTX), so you can fly as if you’re sitting inside the drone. There are two main types of cameras: analog and digital.
Analog cameras are small and lightweight, perfect for tiny whoops. Their resolution is measured in TVL (TV lines), usually ranging from 600TVL to 1200TVL. The higher the number, the clearer the image. Analog video isn’t high-definition, but it’s very fast and responsive, which is why it’s still so popular for flying whoops in tight spaces or indoors.
Digital cameras send a high-definition video signal to your goggles. The image is sharper and more detailed, which makes it easier to spot tree branches and power lines. However, it’s important to know the difference between what you see live in your goggles and what’s recorded.
- The live feed in your goggles is usually around 720p to 1080p. Some systems offer a Race Mode, which transmit video at 580p, which keeps latency as low as possible.
- The onboard recording can record up 4K for some systems, but that footage is saved on the drone, not streamed live to your goggles.
In short, analog gives you fast, reliable video with lower image quality, while digital gives you clearer video with more detail, but can add a bit of weight, cost, and complexity. Either one works great for whoops, depending on your goals.
Camera Mounts & Canopies
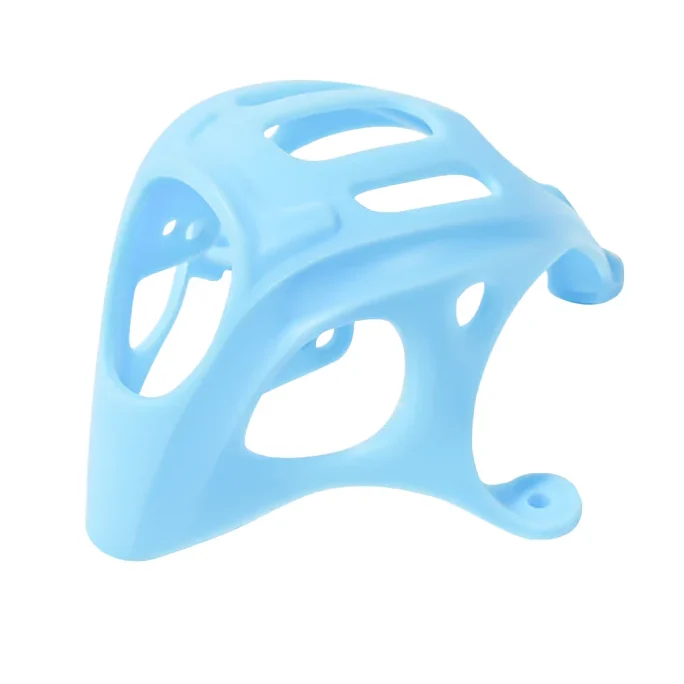
The angle of your FPV camera directly shapes how your whoop flies. A lower camera angle keeps your view more level while the drone stays relatively upright—great for slow, precise flying and tight indoor spaces. A higher angle tilts your view upward, so the drone needs to pitch forward more to fly level, increasing speed and unlocking faster, more aggressive lines. The right camera angle makes flying feel natural and responsive, and dialing it in can completely change your experience in the air.
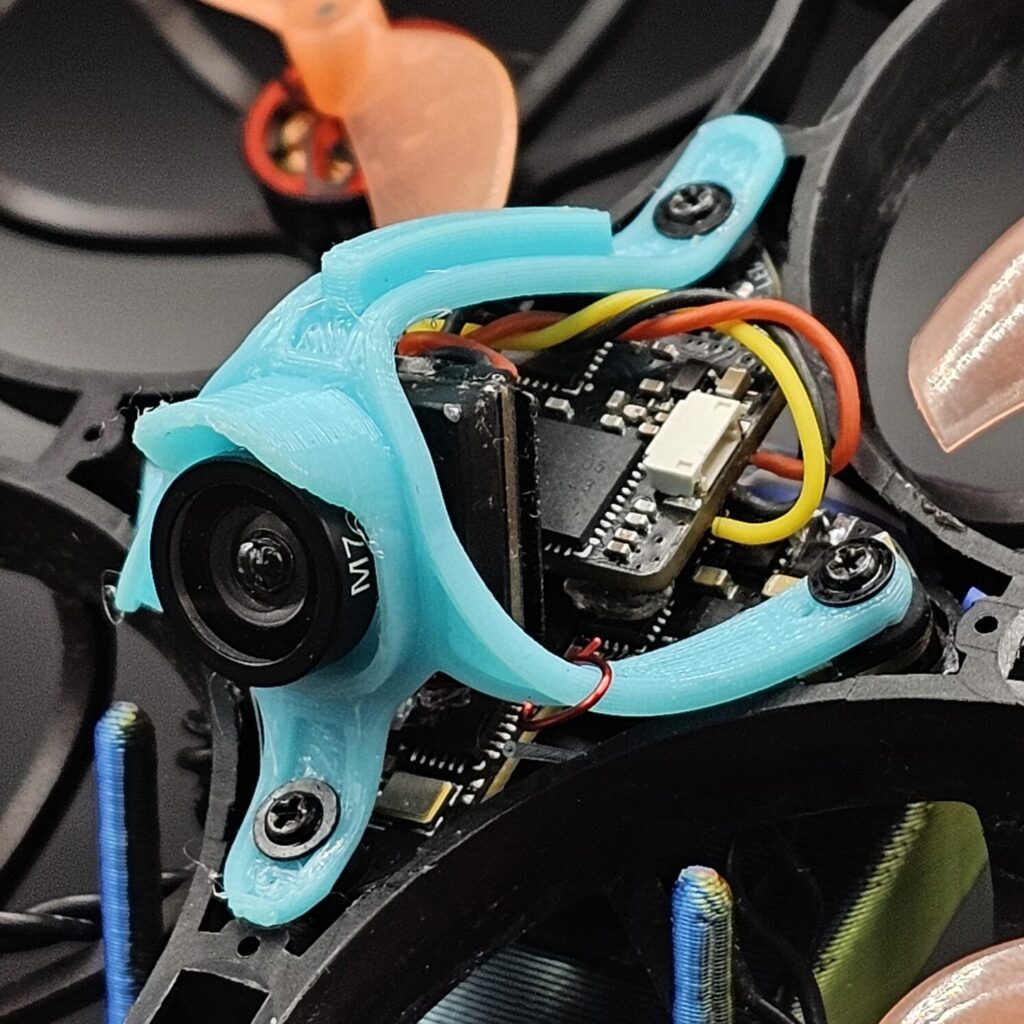
One common option is a injection-molded canopies, which combines a protective shell with a built-in camera holder. These are usually fixed-angle, meaning you can’t adjust the tilt without swapping the entire canopy. What you lose in flexibility, you gain in durability—canopies are very durable and add stability to the overall build. They protect key components like the camera, flight controller, and video transmitter from impacts, helping your whoop survive crashes.
3D-printed camera mounts are a lightweight alternative to full canopies, typically weighing between 0.4 to 1.0 grams. They’re a popular option for pilots who want a specific camera angle or a more customized setup, offering adjustability that molded canopies usually lack. However, that weight savings comes with a trade-off—they offer very little impact protection. Because they’re made of soft, flexible material, crashes can cause the camera to press directly into the flight controller, increasing the risk of damaging internal components due to flexion. For that reason, 3D-printed mounts are generally better suited for experienced pilots who are willing to accept the trade-off between adjustability and durability.
LiPo Batteries for Whoops

Tiny Whoop drones typically use 1S LiHV (high voltage) batteries, which can be charged up to 4.35V per cell, providing more capacity compared to standard 4.20 LiPo batteries. The two most common battery sizes are 300mAh and 450mAh, and the one you use depends entirely on your whoop’s frame size.
- A 300mAh battery is the standard choice for 65mm whoops. It keeps the build light and responsive, perfect for keeping it fast and agile. Expect around 2 to 3 minutes of flight time, depending on how hard you push it.
- A 450mAh battery is better suited for 75mm and 75 Pro whoops. It adds a bit of weight, but in return you’ll get 2.5 to 4 minutes of flight, plus a little more punch for outdoor freestyle.
Battery construction also plays a role. Whoop batteries are either rolled or folded in design. Folded cells tend to offer better performance—they deliver more consistent power, handle bursts of current more efficiently, offer more flight time, and usually have a longer lifespan.
Connectors are another key piece of the puzzle. The outdated PH2.0 plug is nearly obsolete due to its poor connection and voltage sag. Modern whoops use either BT2.0 or A30 connectors, both of which offer strong performance and efficient power transfer. Even better, BT2.0 and A30 are fully cross-compatible, so you can use either type without worrying about adapter issues.
Radios
Beginner FPV Buyer’s Guide
Drone Build Types + Recommended Whoops
intro
explain difference between 65, 65 pro, 75, 75 pro, 85
RTF – Ready to Fly
What it is: RTF stands for “Ready to Fly.” These kits come with everything you need to start flying a drone right away. These kits include the drone (also called a whoop), a controller (called a radio or transmitter), FPV goggles, batteries, and a charger. Just charge up a battery and you’re good to go. No setup, no soldering, no technical know-how required.
Who it’s for: RTF stands for “Ready to Fly,” and it means exactly that—these kits come with everything you need to start flying out of the box. You’ll get a drone (called a whoop), a controller (called a radio or transmitter), FPV goggles to see what the drone sees, plus batteries and a charger. Just charge a battery, power everything on, and take off—no setup, soldering, or tech knowledge needed.
Pros:
- Truly Ready-To-Fly: Everything is already synced and ready to go. All you need to do is charge a battery.
- All-in-one convenience: Comes with everything—no hunting for parts or worrying about set up.
- Lower upfront complexity: No need to understand radio bindings, Betaflight settings, or firmware updates (yet).
- A quick way to find out if FPV is right for you: A low cost and low mental barrier, high instant gratification.
Cons:
- You’ll outgrow the gear quickly: The included goggles and radio are often very basic and can quickly feel limiting as your skills grow.
- Limited future compatibility: RTF transmitters usually don’t work well with other drones, and vice versa—meaning you’ll likely have to upgrade everything when you move to BNF or building your own drone.
- Not always the best value: While they’re simple, RTF kits often use lower-quality components, so you’re paying for convenience rather than performance.
- Harder to repair or upgrade: Some RTF drones use proprietary parts that limit customization or make repairs trickier.
If you want the easiest way to start flying FPV drones, an RTF kit is the way to go. It’s beginner-friendly, low-stress, and gives you everything you need to try the hobby. Just know that if you really get into it, you’ll probably want to upgrade your gear within a few weeks or months. Think of it like training wheels—you’ll want more control and better gear as you quickly improve.
Recommended RTF kits:

Price: $239
The NewBeeDrone Hummingbird V3.1 RTF kit comes with a decent entry-level whoop with a cool twist. While it’s in the RTF category, the Hummingbird itself is essentially a Bind-and-Fly whoop, weighing around 22 grams. It’s heavier than modern whoops, so it requires a bit more throttle for tricks. This makes it ideal for cruising and some light freestyle, rather than hardcore freestyle.
Everything in the kit is designed to keep things simple. The goggles double as a carrying case and battery charger, and the screen can be removed and used as a tiny monitor if you don’t want to wear the goggles right away. The controller is easy to use and works with FPV simulators, so you can practice flying on your computer before heading into the air.
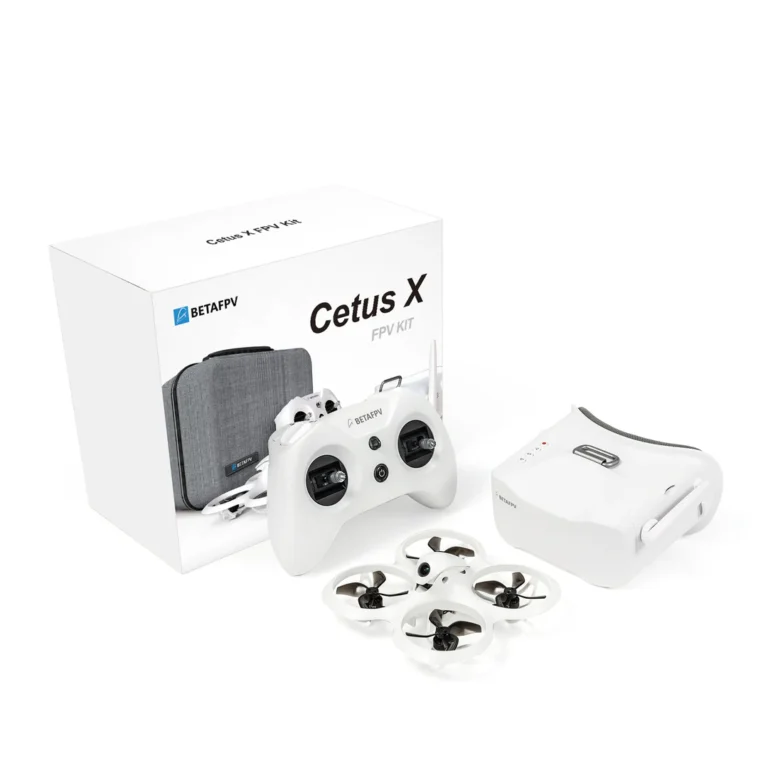
Cetus FC Price: $290
Betaflight Price: $310
The Cetus X FPV Kit is a beginner-friendly bundle designed to help new pilots learn how to fly FPV with confidence. It includes everything you need to get started and is built to make the learning process smoother and less overwhelming. The drone itself is small, lightweight, and easy to control—great for flying around the house or in open outdoor spaces.
What makes the Cetus X special is that it comes in two versions, depending on your skill level. The Cetus FC version includes helpful features like altitude hold and auto-level, which makes it easier to control. This version is perfect if you’ve never flown a drone before and want something that feels safe and easy to manage. The Betaflight FC version, on the other hand, gives you full manual control with acro mode, which is better suited for pilots who want to learn tricks or plan to move into freestyle flying. This version gives you more freedom but also requires more skill.
The drone has an adjustable camera angle, so you can raise it as you start flying faster and more confidently. Each battery gives you around 4 to 5 minutes of flight time. The goggles and controller included in the kit are simple to use and even work with FPV simulators, so you can practice virtually before flying for real.
If you’re new to FPV and want a complete kit that grows with you, the Cetus X is a solid choice. It’s designed to take you from your very first flight all the way to your first flips—without needing to replace everything along the way.

Price: $499
The 533 Analog Whoop Kit bundle is a premium RTF option for beginners who are serious about FPV. The kit features mid-tier goggles and a radio that won’t leave pilots itching for an upgrade anytime soon. The whoop itself is hand-built with modern parts, making it a bit pricier but ensuring a high quality, ready-to-fly experience. It also comes with a ViFly WhoopStor v3 charger, which is the best charger on the market.
It’s an excellent choice for pilots who want gear that grows with them while still having the convenience of a Ready-To-Fly kit.
Please note that Five33 doesn’t list the full whoop specs on their website. I reached out to them and was told, “The specs change quite often, as they are often based on what is available and what is new and proven to work great.” This means that the exact parts you receive can vary from kit to kit. If you’d prefer to know exactly what’s included before buying, it’s worth reaching out to them directly.
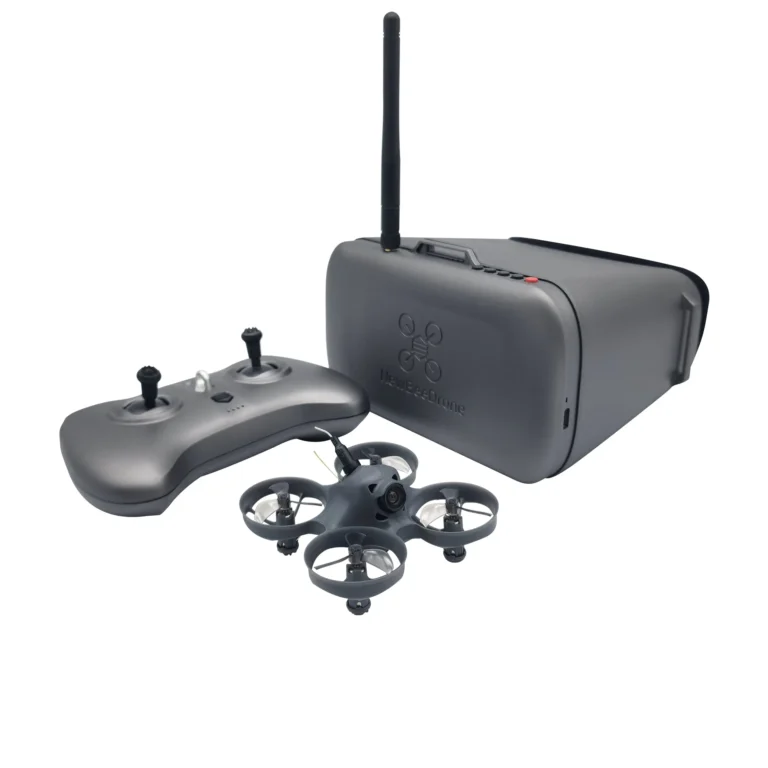
Price: $249
The Aquila16 is a beginner-friendly drone that makes flying feel simple, smooth, and fun. It’s built for cruising rather than tricks, so it’s perfect for just flying around the house or yard and enjoying the experience without feeling overwhelmed.
It comes with multiple flight modes and speed levels, letting you start slow and gradually build confidence. One mode helps the drone hover automatically, which takes some of the pressure off when you’re learning. If you crash and land upside down, you can flip it back over with the push of a button. With around 8 minutes of flight time per battery and a steady video feed, the Aquila16 is a chill, confidence-boosting way to get into FPV.
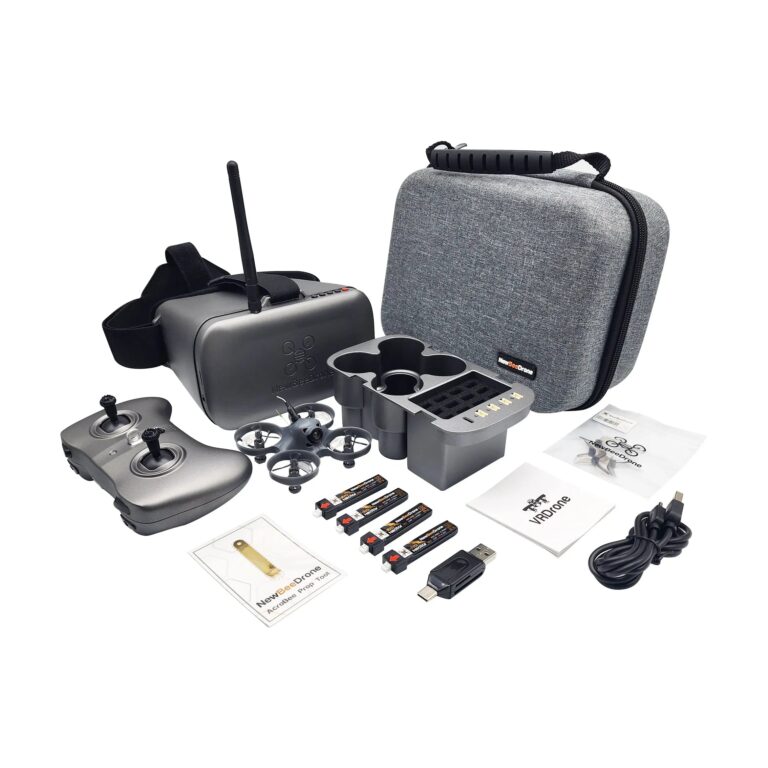
Price: $180
The VRDrone V2.5 is a beginner-focused FPV kit designed for cruising around and learning the basics of flying a drone. It’s perfect if you’re brand new to the hobby and just want something that’s easy to fly indoors without needing to build or set anything up. Like most brushed whoops, it’s not made for freestyle tricks, but it’s great for hovering, turning, and basic movement. Each battery gives you about 5 to 6 minutes of flight time.
Everything in the kit is designed to keep things simple. The goggles double as a carrying case and battery charger, and the screen can be removed and used as a tiny monitor if you don’t want to wear the goggles right away. The controller is easy to use and works with FPV simulators, so you can practice flying on your computer before heading into the air.
If your goal is to cruise around your living room, practice hovering, and learn the basics of FPV without any hassle, the VRDrone V2.5 is a great first step.
BNF – Bind and Fly
What it is:
BNF stands for “Bind and Fly,” and it’s exactly what it sounds like—a fully built drone that’s ready to fly as soon as you bind it to your own radio. Unlike RTF kits, which include everything you need in one box, BNF’s only include the whoop itself . You’ll need your own transmitter, FPV goggles, charger, and batteries to get in the air.
BNF whoops have come a long way in just the past year. Not too long ago, if you wanted a whoop that flew really well, you had to build it yourself. That meant picking the right parts, soldering everything together, and spending time tuning it to get things just right. Now, pre-built whoops are lighter, better tuned, and built with high-quality components. You can get the same level of performance you’d expect from a custom build without having to build anything yourself. Just bind and fly.
Who it’s for:
BNFs are a solid choice for anyone who already has a radio and FPV goggles, and wants a high-quality drone without having to build one from scratch. They’re flown by both beginners and experienced pilots—even pros—because they offer excellent performance with minimal setup. You will need to learn how to bind the drone to your radio, but once that’s done, you’re ready to fly. If you’re comfortable handling a few setup steps and want something that flies great right out of the box, BNF’s are the way to go.
Pros:
- High Performance: Most BNF whoops come with well-tuned flight controllers with high quality parts.
- No Building Required: You don’t need to solder or assemble anything—it’s all done for you.
- Lightweight Designs: Modern BNF whoops are ultra-light, which improves performance and flight time.
- Customizable: Gives you the freedom to upgrade parts as you go, letting you fine-tune your whoop to match your preferences and flying style.
- Used by All Skill Levels: Suitable for both new pilots and experienced pros looking for a reliable, no-hassle option.
- More Gear Flexibility: Lets you choose your own transmitter, goggles, and batteries, which can lead to a better overall experience.
Cons:
- Requires Existing Gear: You must already own (or buy) a compatible transmitter, FPV goggles, charger, and batteries.
- Initial Setup Needed: You’ll need to bind the drone to your radio and configure your settings, which may require some learning if you’re new.
BNF drones strike a great balance between convenience and customization, making them a popular choice for pilots of all skill levels. For those looking to go beyond the limitations of RTF kits, BNFs are a solid next step to dive deeper into the FPV hobby.

Price: $95
Size: 65mm
Flight Time: 2:00 to 3:30 mins
BETAFPV Air65 Freestyle Edition
The Air65 Freestyle is a lightweight 65mm whoop tuned for flowy, controlled flying—perfect for learning tricks and building confidence indoors. With 23,000KV motors and ultralight HQ props, it delivers smooth throttle response and extended flight times, making it easy for beginners to practice freestyle without feeling overwhelmed. It’s a great option for newer pilots who want to focus on smooth lines, throttle control, and fundamentals before stepping up to faster builds. The flight time is between 2:30 to 3:30 mins on a 300mAh battery, depending on throttle and flight style.
BETAFPV Air65 Racing Edition
If you’re ready to go faster, the Air65 Racing steps things up with 27,000KV motors and grippy Gemfan props that give it a noticeably snappier, more aggressive feel. It’s still beginner-friendly, but better suited for pilots who want a faster pace or plan to get into whoop racing. The lightweight Meteor65 Air frame keeps it nimble, and the setup feels sharp in tight spaces. It’s a solid choice for anyone ready to push the tempo while keeping things small and indoor-friendly. The flight time is between 2:00 to 2:45 mins depending on how hard you fly.
Click here to read my full Air65 Freestyle, Racing, and Champion review
Price: $89.99
Weight: 16.5g
Flight Time: 3:00 mins
The Hummingbird Race Spec is an ultra-light 65mm whoop built for speed, precision, and fast-paced indoor racing. At just 16.5 grams, it’s one of the lightest bind-and-fly whoops available, delivering sharp, snappy handling and quick acceleration. It comes equipped with 0702 30,000KV enamel-coated motors and a LiteAF frame—both chosen to maximize performance and keep weight to an absolute minimum.
Maintenance, however, is not beginner-friendly. The motors are directly soldered to the flight controller using ultra-fine pads and dual motor wires, which means replacing them requires solid soldering skills and a steady hand. It’s a clean, minimal build—but not one that’s easy to repair after a hard crash.
Video is handled by a 25mW VTX and a BeeEye camera mounted on a 3D-printed TPU bracket. While lightweight, the mount offers minimal protection, so upgrading to a full canopy is a smart move if you’re planning to push this drone to its limits. The A30 power connector (compatible with BT2.0) gives solid voltage delivery, especially when paired with 300mAh 1S batteries.
Because of its steep camera angle and powerful motors, the Race Spec isn’t ideal for complete beginners. It’s best suited for pilots with some flying experience who are ready to step into high-speed whoop racing or want something ultra-light for aggressive indoor flying.

Price: $104
Weight: 19.2g
Flight Time: 2:00 mins
The Hummingbird V4 is one of those rare whoops that hits the sweet spot between price, performance, and durability. It’s a great option if you’re just getting into FPV and want something that won’t hold you back. Even though it’s a little heavier than most modern whoops at 19.2 grams, the 30,000KV motors give it more than enough punch to stay fun and responsive in the air.
One of the most interest features it offers is the SmartMax 400mW video transmitter. It’s NewBeeDrone’s custom-designed VTX that automatically adjusts power based on signal strength and temperature, giving you a clearer feed when you need it most. Whether you’re flying around furniture or cruising through a park, the video stays clean and reliable. The camera angle is also adjustable, so you can dial it in as your flying improves.
Flight times average around two minutes per battery. It comes with a PH2.0 connector, which is fine to start with, but upgrading to BT2.0 gives you a noticeable bump in punch and adds a bit more flight time. With its strong frame, sturdy canopy, and well-rounded performance, the Hummingbird V4 offers a ton of value for the price.
Price: $
Size: 65mm
Flight Time: 2:00 to 3:30 mins
Price: $
Size: 65mm
Flight Time: 2:00 to 3:30 mins
Price: $
Size: 65mm
Flight Time: 2:00 to 3:30 mins
DIY – Custom Builds
Price:
Plan, create and code internet sites and web pages.
Plan, create and code internet sites and web pages.
Price:
Plan, create and code internet sites and web pages.
Plan, create and code internet sites and web pages.
Price:
Plan, create and code internet sites and web pages.
Plan, create and code internet sites and web pages.
Price:
Plan, create and code internet sites and web pages.
Plan, create and code internet sites and web pages.
Price:
Plan, create and code internet sites and web pages.
Plan, create and code internet sites and web pages.
Price:
Plan, create and code internet sites and web pages.
Plan, create and code internet sites and web pages.
Price:
Plan, create and code internet sites and web pages.
Plan, create and code internet sites and web pages.
Price:
Plan, create and code internet sites and web pages.
Plan, create and code internet sites and web pages.
Price:
Plan, create and code internet sites and web pages.
Plan, create and code internet sites and web pages.
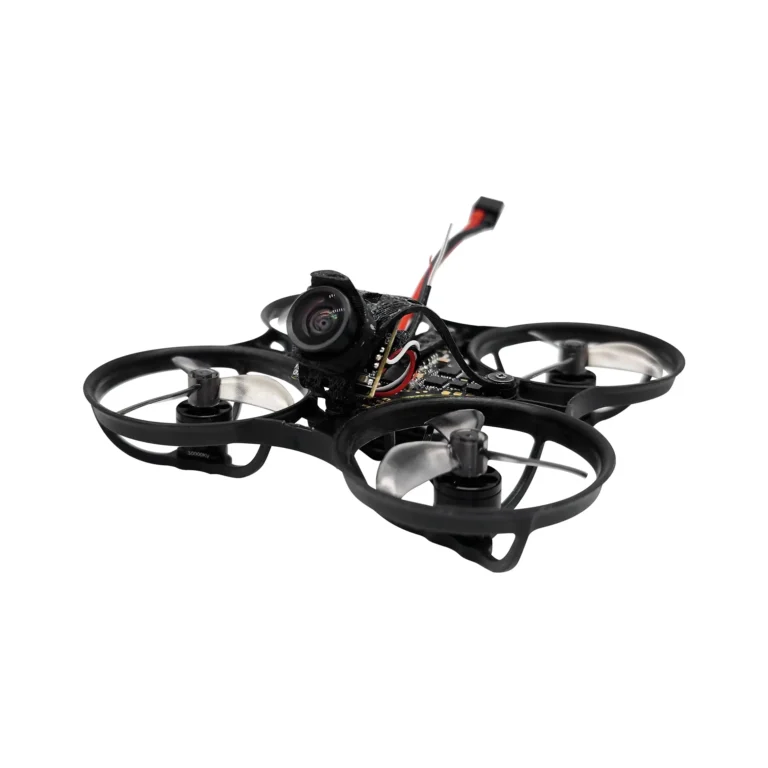
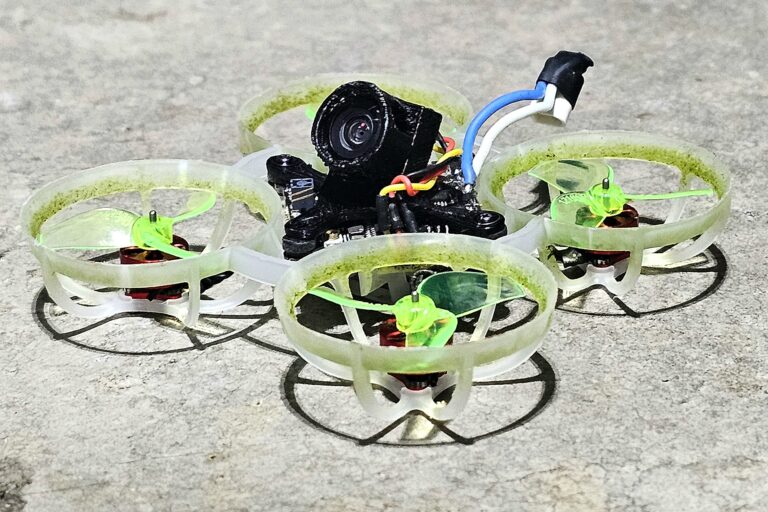
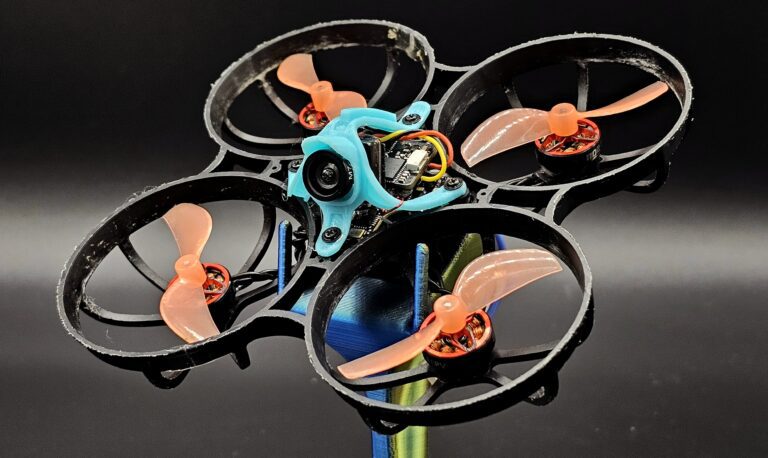
Custom Build Examples
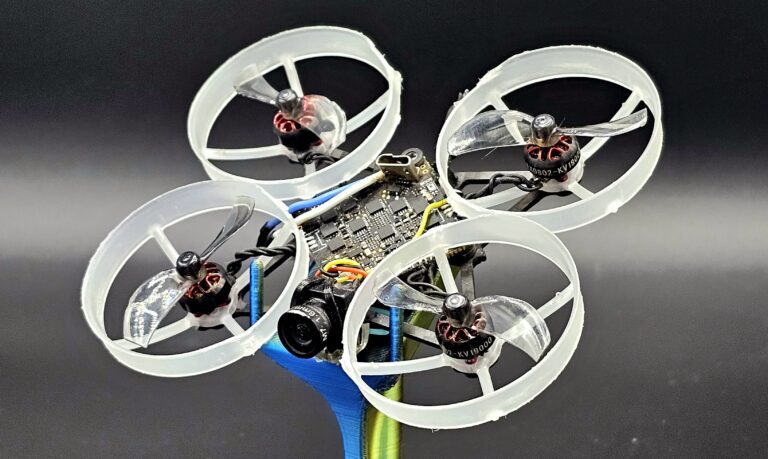
Digital
Price:
Plan, create and code internet sites and web pages.
Plan, create and code internet sites and web pages.
Mention PNP, but irrelevant to this guide.
Essential Gear Checklist
Everything you need to actually fly:
- Transmitter (Radio)
- Gamepad vs. full-size
- ELRS, sim compatibility, future-proofing
- FPV Goggles
- Analog vs. digital
- Budget to premium breakdown
- Comfort, DVR, FOV, etc.
- Batteries and Chargers
- 1S LiHV (300 vs. 450mAh)
- BT2.0 vs. A30
- Charging options
- Battery safety
- Tools & Accessories
- Spare props
- Screwdriver, prop remover
- Canopy screws, USB cables, LiPo bag
Budget Guide
- Suggested full kits by price range ($300 / $500 / $800)
- What to expect at each level
- Where to prioritize spending
- Example bundles for each tier
Whoops for Kids
- Best RTF kits for younger pilots
- Safety and supervision tips
- Tips for configuring throttle limits or angle mode
- Making the hobby fun and frustration-free
Simulator First or Real Flight?
If you’re just getting into FPV, you’re probably itching to unbox your whoop, plug in a battery, and take off. I get it—the excitement is real. But before you send it into a wall or watch it tumble out of the sky, hear me out: start in a simulator.
If you’ve never flown a drone before, spending just 5 to 10 hours in the sim can completely change how your first real flight goes. It’s tempting to skip this step and dive straight in, but that sim time builds the core control and reflexes you’ll need to avoid crashing or losing your drone the moment it takes off. You’re not trying to master flips or fancy tricks—you just want to fly smoothly, stay in control, and feel confident. The goal is to make your first real flight exciting, not overwhelming. Put in the time now, and you’ll give yourself a much better first impression of FPV.
That’s how I started—by logging over 200 hours before I ever touched a real drone. It was probably overkill, but that excessive practice gave me a huge advantage. By the time I armed my first drone, I already knew how to control my throttle, recover from dives, and perform intermediate tricks without panic. And yeah, I still crashed—but not nearly as much as I would’ve if I had gone in blind.
Flying FPV isn’t like flying a DJI drone from CostCo. There’s no GPS, no auto-hover, and no “save me” button. The controls are sensitive, the pace is fast, and even a simple turn takes real coordination. A simulator gives you the freedom to make every mistake in the book, over and over, until your thumbs just know what to do. That’s muscle memory—and it’s everything in this hobby.
If you want to actually enjoy flying instead of having anxiety every takeoff, start here. The sim isn’t just a training tool—it’s where you become a pilot.
Why Start with a Simulator?
Flying FPV without preparation is like being thrown into the deep end before you’ve learned how to swim. The controls are manual, the learning curve is steep, and there’s no safety net once you’re in the air. Simulators change the game. They give you a space to fail without consequences—a place to learn the controls, develop your instincts, and crash a thousand times without breaking a thing. By the time you’re ready to fly a real drone, you’ll already have the foundation you need to stay in control and actually enjoy the experience.
- Cost-Effective Learning:
Simulators are the most budget-friendly way to get started in FPV. All you need is a cheap radio controller and sim software—no need to buy a drone, charger, batteries, or goggles right away. This gives you a chance to test the waters, see if the hobby clicks for you, and build skills without committing to a full setup upfront. - Risk-Free Environment:
In the sim, you can crash as much as you want without breaking anything. Want to try that powerloop again? Go for it—no repairs needed. This risk-free environment encourages experimentation, speeds up your learning, and lets you push your limits without worrying about damaging your gear. - Build Real Muscle Memory:
The more time you spend in a simulator, the more your stick movements become second nature. You’ll develop throttle control, smooth coordination, and reaction timing that carry over directly to real-world flying. When your whoop finally takes off, your thumbs will already know what to do. - Confidence Boost:
By the time you’re ready to fly for real, you’ll feel like you’ve already been doing it for weeks. That familiarity turns anxiety into confidence and makes your first flight feel like a milestone—not a gamble. You’ll enjoy it more, fly better, and be way less likely to panic when something doesn’t go as planned.
Top Simulators for Whoop-Style Flying
Simulators are one of the best tools you can use to build real flight skills before ever arming your drone. But when it comes to whoops, the truth is: most simulators don’t perfectly replicate how whoops feel. Many were originally built around 5-inch quads, and while those physics tend to be spot-on, whoops often come across as heavier, slower, or floatier than they are in real life. That said, all of the sims below still offer valuable training—and some get closer than others to the real thing.
Also worth noting: training with a 5-inch drone in a sim is a completely valid and effective approach, even if you only fly whoops in real life. Larger quads have more hangtime, which gives you extra time to plan and execute tricks—great for learning mechanics and flow. As long as your sim rates match your real drone, the stick movements will transfer almost 1:1. Just keep in mind that when you switch to a real whoop, you’ll have less punch and much less hangtime, so you’ll need to compensate by staying higher during tricks to avoid slamming into the ground. That awareness becomes second nature quickly—and the foundational skills you build in the sim will still serve you well.
VelociDrone
VelociDrone is one of the most widely used simulators in FPV—not because it’s flashy, but because it delivers precision where it counts. The graphics are basic, but the physics are among the best of any sim: consistent, reliable, and well-tuned for both racing and freestyle. Whoops feel a bit heavier than today’s ultralight 65mm builds, but the overall control feel is decent and helps develop real-world skill. What really sets VelociDrone apart is its massive map library and active community—you can fly everything from tight indoor apartments to expansive warehouses, build your own custom tracks, and download community-made maps and race tracks. It’s also the official simulator for online whoop events like the WeBleed Whoop Series and Lafayette Weekly races. If you’re serious about whoop racing or want to train in the same environment as the top pilots, VelociDrone is the go-to simulator.
Liftoff: Micro Drones
Liftoff: Micro Drones is built specifically with whoops and small drones in mind, making it an approachable, beginner-friendly simulator. The graphics are clean, colorful, and polished, providing an enjoyable visual experience. Its flight physics tend to feel slightly floaty, with drones carrying a bit more momentum compared to real-life whoops—but this encourages smoother stick control and helps you practice precise throttle management. While Liftoff Micro doesn’t support community-made tracks, it offers plenty of variety through creative built-in environments, including japanese neighborhoods, warehouses, and playful indoor setups. It doesn’t have a major competitive racing scene, but if you’re looking for a fun and relaxed simulator that’s effective for casual freestyle practice, Liftoff Micro is a strong choice.
FPV Logic
FPV Logic is a freestyle-focused simulator that offers one of the most realistic and customizable flight experiences for whoops and small quads. The physics feel great out of the box, with many pilots only needing to bump the gravity up slightly (around 10–20%) to better match real-world whoops. One of its standout features is the ability to adjust rates and physics live while flying, making it easy to fine-tune your drone’s behavior in real time. Visually, the graphics are sharp and modern, and its signature map—Factory 2—is a massive, open environment that many consider the best freestyle map in any sim. While the map selection is limited and the sim doesn’t include multiplayer or a strong racing mode, it excels at giving solo pilots a smooth, immersive place to practice freestyle. The game is available on Steam, and if it’s not a fit for you, you can get a full refund as long as you stay under two hours of playtime within 14 days. If realistic physics, immersive freestyle, and easy customization are your priorities, FPV Logic is a strong choice.
Uncrashed
Uncrashed FPV Simulator stands out with impressive graphics and immersive, cinematic environments—featuring expansive cityscapes, mountain ranges, and abandoned factories. While it doesn’t include built-in whoop models, it allows extensive customization of drone parameters, so you can manually dial in a drone that closely matches your real-world whoop. The default physics are smooth but tend to feel a bit floaty, making it ideal for freestyle exploration rather than precise technical practice. It supports community-created maps through Steam Workshop, giving you access to additional environments for creative flying. Although Uncrashed isn’t used for organized racing or tight technical training, its stunning visuals and freestyle-friendly atmosphere make it perfect if you’re looking to experiment, explore, and fly creatively.
Maximize Your Training
Whether you’re flying in the sim or jumping straight into the real thing, it’s tempting to just plug in and fly around aimlessly. And while that’s definitely part of the fun, it’s not the fastest way to improve. If you really want to get better, you need to train with purpose. The best pilots don’t just fly more—they fly smarter. Here’s how to turn every session into real progress:
- Start with a goal.
Before you begin your practice session, decide what you’re trying to improve. Maybe it’s learning a new trick, tightening up your throttle control, building smoother lines through gaps, or improving something you already know. Having a goal gives your session direction and helps you avoid just flying in circles without progress. - Warm up your thumbs.
There’s no need to rush into tricky maneuvers right away—start your session with some smooth, relaxed flying. Spend the first 5–10 minutes cruising around, flying clean lines, and orbiting obstacles. It helps reconnect your hands to your sticks and shakes off that first-flight stiffness. A proper warm-up gets you in the zone and sets the tone for a more productive session. - Practice deliberately, not aimlessly.
Time in the sim only helps if you’re using it as a tool to improve. Flying the same way over and over without changing anything won’t take you anywhere—you’ll just be reinforcing bad muscle memory. The key is to fly with intention. When you mess up a trick, don’t just shrug and move on. Pause, ask yourself what went wrong, and what you could’ve done differently to avoid the mistake. Then try again with that adjustment in mind, and keep repeating the process until it sticks. That’s how real progress happens. And always remember: if you’re not crashing, you’re not learning. Mistakes aren’t failures—they’re feedback. Use them to your advantage, learn from them, and don’t let them shake your confidence. - Break down tricks into building blocks.
When you’re learning a new trick, don’t try to force the whole thing all at once. Most freestyle moves are just combinations of simpler motions. If you break a trick down into its parts, build muscle memory for each one, and then slowly piece them together, you’ll learn faster—and with way less frustration. Let’s use the Immelmann as an example. It’s made up of two parts: the first half of a powerloop, followed by a half roll to level out.- Start by focusing only on the vertical climb. Hover in front of an object and practice giving just enough throttle to rise above it. Do this several times until you have a solid feel for how much throttle it takes to clear the height of the object.
- Next, fly under and past the object and apply that same throttle as you pass it. Once you think you’ve gone high enough, stop and turn around to see if you would’ve cleared the object. If not, adjust—maybe you didn’t give enough throttle, or your timing was off. The goal of this step is to learn to rely on muscle memory, since you won’t be able to see the object behind you while performing the trick.
- Then start adding pitch to begin the arc of the powerloop. Fly under and past the object, apply throttle, and gradually pitch back until you’re fully inverted (upside down) and directly over or slightly behind the object. Did you successfully perform a half powerloop around the object or did you crash into it? Make small adjustments to your throttle and pitch timing until you consistently reach that inverted apex without flying into the object.
- Once that part feels solid, move on to the second half of the Immelmann—adding a clean half roll to finish the trick. Start by practicing just the roll on its own: fly high into the air and perform a segmented roll—do a half roll, pause to check if you finished exactly at 180 degrees, then complete the second half. Keep repeating this motion until you can consistently stop the roll right at 180 degrees every time, without over-rotating or falling short. Once that muscle memory is locked in, you’re ready to combine it with the first half of the trick.
- Once you’re comfortable with both the half powerloop and the half roll, tie them together: fly under and past the object, pitch into the half powerloop until you’re fully inverted above it, and then perform a smooth half roll to finish the trick.
- Breaking tricks down into smaller steps gives you a clearer understanding of how each part works—from the timing to the stick inputs. It’s not just about landing the trick once; it’s about building consistency by mastering the fundamentals behind it. The better you understand the motion, the more repeatable and reliable your execution becomes.
- Repetition builds consistency.
Once you’ve started to learn a few tricks, the only way to make them stick is through repetition—over and over. Try the same trick from different entry angles, at different speeds, and on obstacles of various sizes to build adaptability, not just muscle memory. Your goal should be to land the trick at least 75% of the time, even if it’s a little sloppy at first. Once it starts to feel natural, begin working it into your freestyle flow. Repetition isn’t just about pulling it off—it’s about owning it. - Use the Bootcamp.
If you want a structured way to improve, the Pro Whooper Boot Camp is the perfect place to start. It’s a free, step-by-step training program built specifically for whoop pilots—whether you’re brand new or looking to sharpen your freestyle skills. The bootcamp walks you through everything from setting up your rates and learning basic stick control, to mastering beginner/novice tricks and building flow. Each lesson is designed to build on the last, so you’re never stuck wondering what to practice next. Think of it as your personal training program: structured, focused, and made to help you improve fast. - Use the Tricktionary.
The Tricktionary on prowhooper.com is your go-to resource for learning and improving freestyle tricks. It features over 90 tricks, each categorized by difficulty and type, so you can easily find something that fits your current skill level. Every trick includes visual examples, stick input breakdowns, and helpful tips to guide your practice. Pick one or two to focus on each week and work them into your sessions. It’s one of the best ways to stay focused, challenge yourself, and make steady progress without flying aimlessly. - Practice daily (even just a little).
You don’t need a full training session every day—just 10 minutes of flying can still move you forward. It keeps your thumbs warm, your coordination sharp, and your stick movements smooth. But skip too many days, and that rhythm starts to fade. Even short sessions help lock in muscle memory and make sure you’re not rusty the next time you fly. Stay consistent, and the progress will stack up faster than you think. - Match your real drone’s rates.
Your rates control how fast your drone responds to stick movement, and if they don’t match between your sim and your real whoop, your muscle memory won’t line up. You might nail tricks in the simulator, only to feel completely off when flying in real life. To make sure your practice actually pays off, keep your sim rates identical to your IRL setup. When the feel is the same, the skills transfer naturally. - Don’t forget to have fun.
Not every session needs to be focused on drills or structured practice. Once you’ve hit your goal for the day, take some time to just play—try weird tricks, experiment with new lines, or fly purely for the fun of it. Freestyle is all about creativity and expression, and the simulator is the perfect place to explore that without consequences. Let yourself enjoy the process—it’s what keeps the passion alive.
Keep Showing Up
Improving at FPV isn’t about talent—it’s about putting in the time, flying with intention, and showing up consistently. You don’t need to master everything overnight, and you definitely don’t need to fly like your favorite pilot to enjoy the process. What matters is that you keep learning, keep experimenting, and keep pushing yourself a little further every time you fly. Whether you’re grinding through a tough trick, flowing through your favorite map, or just warming up your thumbs after a long day—it all adds up. Stay curious, stay consistent, and above all—have fun with it. Do this and you’ll become a better pilot in no time!
Transitioning from Simulator to Real Flight
Making the leap from virtual flying to the real thing is a big milestone—and it’s where all your practice starts to pay off. Here’s how to make that transition as smooth as possible:
Feel the Difference:
Simulators are an incredible tool for learning stick movements, timing, and control—and that’s exactly what they’re meant for. But once you fly a real whoop, you’ll notice it behaves differently. Real whoops feel lighter, drop faster, and don’t float through the air like they often do in the sim. If you’ve been practicing with 5-inch quads, the difference is even more noticeable—your whoop won’t have the same power or hangtime, and you’ll need more throttle to keep it in the air during tricks. That’s okay. Your sim training still gave you the muscle memory—you’ll just need to adjust your timing and throttle to match how it actually flies.
Match Your Rates:
Make sure the rates you’ve been flying in the simulator match the rates on your real whoop. If they’re different, the stick feel will throw you off, and your muscle memory won’t transfer as cleanly. Keeping them the same helps everything feel familiar from the start.
Start Simple:
Your first flights should be slow and controlled. Get a feel for how your whoop responds in real life—hover, fly basic lines, and test out throttle response. Once you’re comfortable, slowly work in the tricks you’ve been practicing.
Be Patient:
No matter how solid you were in the sim, flying IRL comes with new challenges—wind, obstacles, nerves, and unpredictability. Mistakes will happen. That’s normal. Give yourself time to adapt, keep your expectations realistic, and most importantly, don’t let a rough start shake your confidence. You’ve already put in the work—now it’s just about adjusting to the real world.
Configuring your whoop
- Binding Process Step-by-step instructions for binding your transmitter to the receiver and goggles.
- Configuring Betaflight (and what not to mess with at first)
- Firmware Updates
Ensuring your FC is running the latest firmware. - PID Tuning and Rates Adjustment
Optimizing flight characteristics for stability and responsiveness. - Mode Setup
Configuring flight modes (Angle, Horizon, Acro) and switch assignments. - OSD (On-Screen Display) Configuration
Customizing the information displayed during flight. - ESC Firmware and Protocols Introduction to BLHeli and Bluejay firmware, including flashing and configuraton
- Firmware Updates
- QuickSilver
- Setting up modes: angle vs. acro
- Setting rates and switch assignments
- Test hover checklist and first flight advice
Lipos
Understanding batteries, charging safety, and battery care
* when to land, storage voltage, discharging, charging
Troubleshooting, Repairing, and Maintence
- Diagnosing common whoop problems and how to fix them
- Addressing problems like motor failures, video feed issues, and binding difficulties.
- Diagnosing motor, FC, or VTX issues
- Soldering
- Prop swaps, frame repairs, and basic troubleshooting
- Tools and spares to keep in your repair kit
- webapps – betaflight, esc-configurator, elrs
Tuning
- Betaflight Presets
- Blackbox Tuning
- PID Toolbox
- By Ear
How to make an FPV video
Recording, Editing, Uploading videos
- refer to goggle manual for compatible SD card specs
- check goggle settings for manual vs auto recording
- explain the difference
- List common video editing programs
- davinci resolve (free and paid)
- capcut (free and paid)
- remove audio from dvr, add music
- Shauny D’s Video for editing
- uploading to youtube
Joining the FPV Community
Whoop Lounge Discord
Flying Responsibly
Where to fly legally (and how to avoid FAA trouble)
YouTubers you should follow
- Top Whoop Reviewers to watch
- Nick Burns
- Infinity Loops
- Moe FPV
- Top Whoop Freestyle Pilots to watch
- Tyrantt
- Callisto
- Akira
- Moe
- Heads
- JALFPV
- Shauny D
- SweemTube
- Avasian
- Top Racers to watch
- Callisto
- TDog
- Neon
- AK
- Heads Up
- Werdna
- Where to watch FPV content
- YouTube – tons with fpv content, but it’s overloaded with promotional content and vlogs.
- Instagram – great for new freestyle content, significantly less promotional videos.
- Facebook – some freestyle videos, but significantly less than YouTube and Instagram. Primarily used for discussions and asking questions
- Reddit – some freestyle videos, but significantly less than YouTube and Instagram.
- TikTok – practically no freestyle content.
Recommended Shop List
US Shops
- weBLEEDfpv –
- NewBeeDrone – NewBeeDrone is based in California and is a one stop drone shop. they started as a whoop shop, but expanded into a full retail website that offers a wide range of items that includes drones of all sizes
- TinyWhoop –
- BlackMarketFPV –
- Pyrodrone –
China Shops
- Betafpv –
- GNB –
- AliExpress –
Europe Shops
- UK? Europe? Canada?
- Do Not Recommend
- GetFPV – A US based company. Slow shipping speeds and sketchy store policies
- RDQ – owned and operated by GetFPV
Guide Overview (quick start guide?)
meeting new pilots. Locator
events to participate in. Tpw, igow, online racing